Wednesday, June 24, 2009
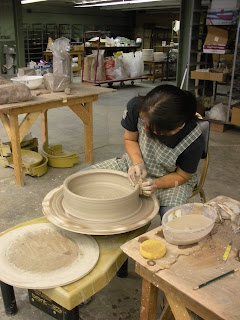
David Stuempfle Coiling Workshop
I attended a 3 day workshop on coiling large pots taught by David Stuempfle at Central Carolina Community College in Siler City, NC . David demonstrated how to make large coils that were an even thickness and proper length for the pot base. He showed how he attached the coil in a rhythmic motion with his thumb and middle finger. This was followed by a wooden paddle and anvil with a similar premise, paddling the clay with a consistent force and rhythm to make the walls. There were also weed burners involved. Always fun to add fire when throwing.
The pots I made were not that great or even made it through the whole process, but I got a tremendous amount of practice and feedback about how to improve. It's always good to have someone help you work out the kinks when learning a new technique. I think I have some concept of the fundamentals of coiling and just need hours and hours of practice...and hours.
Tuesday, June 16, 2009
Knock Knock
Sometimes what you need comes and knocks on your door. Bakerworks Construction was knocking on doors in our neighborhood a few weeks ago offering all types of house renovations from kitchens to decks, no job is too small. Hmm. I've need shelves in my basement for a couple of years now, this seems to be as good a time as any.
I unfortunately have not had much exposure to building things myself, no one in my family has ever built anything that I can recall. My beloved does not have experience in that department either (he's an awesome cook and bass player though). My friend Jason, who is in the band Red Collar, promises he'll show me how to use different saws when he gets a break from touring. I can foresee needing these skills when building my future kiln. My first lesson, the jigsaw, should be soon, maybe at the end of July. Until then, I'll use Bakerworks.
In two half days the guys turned my basement into an efficient workspace. What a change it has made! Why didn't I do this before now? This renovation tripled my space for ware boards. It also forced a much needed organization of the space. My wheel is now stable and at the proper height. The guys used wood that was left by the previous owner of our house. I like the weathered rustic feel it gives. Check out the before and after pictures. The before pictures are obviously at the bottom. Actually I'm a little embarrassed by the before pictures now, but it makes the after look that much better.
Sunday, June 14, 2009
Pin Projekt Auction
The Pin Projekt Auction was a few weeks ago, but I am just now getting around to posting pictures. It was very successful and I was honored to be part of it. The Troika Music Festival will take place in many venues all over Durham November 5, 6 and 7, so mark your calenders.
Monday, June 8, 2009
Starworks Large Platter/Bowl Workshop
On Saturday I attended a small afternoon workshop on large platters given by Hitomi Shibata at Starworks. I thoroughly enjoyed this workshop, one because Hitomi is a great teacher and two because the technique was so different than I had ever seen. Half of the throwing process involved hitting the clay into place without water. Twelve pounds of clay was placed in the center of the wheel on a bat. While the wheel was slowly turning the clay was hit with both hands rhythmically and simultaneously to center the clay.
Once centered, the clay was opened up with the palm in a downward motion at the center.
The clay walls were coned inward and outward several times to get an even wall thickness. Then the walls were pulled to the desired thickness in a cylinder shape.
The rim was a little thicker than the rest of the wall because later as the walls are flattened more horizontal, the rim will thin. Gradually the wall was folded outward starting at the rim and working down the wall until a nice angle was achieved.
When throwing my bowl, it was at this point Hitomi kept telling me to make it wider. The bowl I made was much wider than I would have made without such encouragement. I did not believe that the walls could undergo that much stress until I was forced to do so. Starting at the rim is the key.
This was done until the desired thickness of the floor was achieved, approximately 3/4 to 1 inch thick. The center was widened more and more until the basic shape of the platter was formed, the walls were still very thick but it was opened to the point where the walls would begin. At this point water was added to smooth out the palm impressions.
The clay walls were coned inward and outward several times to get an even wall thickness. Then the walls were pulled to the desired thickness in a cylinder shape.
The rim was a little thicker than the rest of the wall because later as the walls are flattened more horizontal, the rim will thin. Gradually the wall was folded outward starting at the rim and working down the wall until a nice angle was achieved.
When throwing my bowl, it was at this point Hitomi kept telling me to make it wider. The bowl I made was much wider than I would have made without such encouragement. I did not believe that the walls could undergo that much stress until I was forced to do so. Starting at the rim is the key.
Tuesday, June 2, 2009
Machu Picchu
Since I can not articulate the beauty of Machu Picchu myself, I'd like to quote Hiram Bingham.
"In the variety of its charms and the power of its spell, I know of no place in the world which can compare with it. Not only has it great snow peaks looming above the clouds more than two miles overhead, gigantic precipices of many-colored granite rising sheer for thousands of feet above the foaming, glistening, roaring rapids; it has also, in striking contrast, orchids and tree ferns, the delectable beauty of luxurious vegetation, and the mysterious witchery of the jungle." No doubt, this was one of my favorite trips of all time. The first photo is Machu Picchu from inside the ruins. The next one is the agricultural terraces (look how small the people are).
The adventure portion of our trip was a hike to the top of Wayna Picchu, the mountain that is generally the backdrop of most pictures and paintings of Machu Picchu (just like my photo). At first glance it appears difficult to climb but although the ascent is steep its not technically difficult. The path has no handrails and its edges fall abruptly to a deep gorge. With that being said, as we climbed I couldn't help but wonder how many had fallen off this mountain. You had to be in good physical shape and take great care with each step, one missed step and off you go. There were steel cables in some areas to provide support. Many times I climbed with hands as well as feet, there was security in being close to the ground. Also I was fine as long as I had one side of the mountain to cling to for safety. Once at the top I found it difficult to stand upright. I felt the wind could blow me off (see photo with bad posture). In addition I was also dizzy...altitude or fear or maybe both. Steven did not make it out on top. He had a quick look and said no thanks. The other photo is of Machu Picchu from Wayna Picchu (look how tiny MP looks).
Once we returned home I searched the Internet for deaths/accidents at Machu Picchu. No searches came up with any statistics. The fact that the Peruvian government is not liable for these deaths could be a reason for not keeping up with such facts (or at least publishing them). The only thing I came across was " There have been some accidents and in every case the most difficult thing was finding the corpses afterward. " Yep, I climbed that mountain.
The pottery portion of the trip included a visit to Lima's Rafael Larco Herrera Museum. The private museum is said to house over 45,000 pots, many of which were collected in the 1920's by a former vice president of Peru. This photo is of the storeroom in which most pots were housed, they were stacked in many cases all the way to the ceiling. The museum displayed the best pieces, but photography was not allowed inside the main museum. The type of vessel that was most memorable to me was the stirrup-spout vessels. The spout, looked like a saddle stirrup and appeared to be how the vessel was carried. There was a graphic inside that showed how the spouts were made (hand-built), if anyone needs a demo, I can give it a try.
Subscribe to:
Posts (Atom)